Guía de la pantalla OLED I2C con Arduino
Este artículo muestra cómo usar la pantalla OLED I2C SSD1306 de 0.96 pulgadas con el Arduino. Te mostraremos algunas características de la pantalla OLED, cómo conectarla a la tarjeta Arduino y cómo escribir texto, dibujar figuras y mostrar imágenes en mapa de bits. Por último, construiremos un proyecto de ejemplo que muestra lecturas de temperatura y humedad.

Presentación de la pantalla OLED de 0.96 pulgadas
La pantalla de diodo orgánico emisor de luz (OLED) que usaremos en este tutorial es el modelo SSD1306: una pantalla monocromática de 0.96 pulgadas con 128×64 pixeles, como se muestra en la siguiente figura.

La pantalla OLED no requiere retroiluminación, lo que da como resultado un contraste muy agradable en ambientes oscuros. Además, sus pixeles consumen energía solo cuando están encendidos, por lo que la pantalla OLED consume menos energía en comparación con otras pantallas.
El modelo que usamos aquí tiene solo cuatro pines y se comunica con el Arduino mediante el protocolo de comunicación I2C. Hay modelos que vienen con un pin RESET adicional. También existen otras pantallas OLED que se comunican por SPI.
Conexión de pines
Como la pantalla OLED usa el protocolo de comunicación I2C, el cableado es muy sencillo. Solo necesitas conectarla a los pines I2C del Arduino Uno como se muestra en la tabla de abajo.
| Pin | Conexión al Arduino Uno |
| Vin | 5V |
| GND | GND |
| SCL | A5 |
| SDA | A4 |
Si usas una tarjeta Arduino diferente, asegúrate de verificar los pines I2C correctos:
- Nano: SDA (A4); SCL (A5);
- MEGA: SDA (20); SCL (21);
- Leonardo: SDA (20); SCL (21);

Bibliotecas
Para controlar la pantalla OLED necesitas las bibliotecas adafruit_SSD1306.h y adafruit_GFX.h. Sigue las siguientes instrucciones para instalarlas.
1. Abre el IDE de Arduino y ve a Sketch > Include Library > Manage Libraries. Debería abrirse el Gestor de Bibliotecas.
2. Escribe “SSD1306” en la caja de búsqueda e instala la biblioteca SSD1306 de Adafruit.

3. Después de instalar la biblioteca SSD1306 de Adafruit, escribe “GFX” en la caja de búsqueda e instala la biblioteca.

4. Después de instalar las bibliotecas, reinicia el IDE de Arduino.
Consejos para escribir texto usando estas bibliotecas
Aquí tienes algunas funciones que te ayudarán a manejar la biblioteca de la pantalla OLED para escribir texto o dibujar gráficos sencillos.
- display.clearDisplay() – todos los pixeles se apagan
- display.drawPixel(x,y, color) – dibuja un pixel en las coordenadas x,y
- display.setTextSize(n) – define el tamaño de la fuente, admite tamaños del 1 al 8
- display.setCursor(x,y) – define las coordenadas donde empezará a escribirse el texto
- display.print(“mensaje”) – imprime los caracteres en la posición x,y
- display.display() – llama a este método para que los cambios surtan efecto
Prueba de la pantalla OLED
Después de cablear la pantalla OLED al Arduino e instalar todas las bibliotecas necesarias, puedes usar uno de los ejemplos de la biblioteca para ver si todo funciona correctamente.
En el IDE de Arduino, ve a File > Examples > Adafruit SSD1306 y selecciona el ejemplo para la pantalla que estés usando.

Debería cargarse el siguiente código:
/*********
  Complete project details at https://randomnerdtutorials.com

  This is an example for our Monochrome OLEDs based on SSD1306 drivers. Pick one up today in the adafruit shop! ------> http://www.adafruit.com/category/63_98
  This example is for a 128x32 pixel display using I2C to communicate 3 pins are required to interface (two I2C and one reset).
  Adafruit invests time and resources providing this open source code, please support Adafruit and open-source hardware by purchasing products from Adafruit!
  Written by Limor Fried/Ladyada for Adafruit Industries, with contributions from the open source community. BSD license, check license.txt for more information All text above, and the splash screen below must be included in any redistribution.
*********/

#include <SPI.h>
#include <Wire.h>
#include <Adafruit_GFX.h>
#include <Adafruit_SSD1306.h>

#define SCREEN_WIDTH 128 // OLED display width, in pixels
#define SCREEN_HEIGHT 64 // OLED display height, in pixels

// Declaration for an SSD1306 display connected to I2C (SDA, SCL pins)
#define OLED_RESET     -1 // Reset pin # (or -1 if sharing Arduino reset pin)
Adafruit_SSD1306 display(SCREEN_WIDTH, SCREEN_HEIGHT, &Wire, OLED_RESET);

#define NUMFLAKES     10 // Number of snowflakes in the animation example

#define LOGO_HEIGHT   16
#define LOGO_WIDTH    16
static const unsigned char PROGMEM logo_bmp[] =
{ B00000000, B11000000,
  B00000001, B11000000,
  B00000001, B11000000,
  B00000011, B11100000,
  B11110011, B11100000,
  B11111110, B11111000,
  B01111110, B11111111,
  B00110011, B10011111,
  B00011111, B11111100,
  B00001101, B01110000,
  B00011011, B10100000,
  B00111111, B11100000,
  B00111111, B11110000,
  B01111100, B11110000,
  B01110000, B01110000,
  B00000000, B00110000 };

void setup() {
  Serial.begin(115200);

  // SSD1306_SWITCHCAPVCC = generate display voltage from 3.3V internally
  if(!display.begin(SSD1306_SWITCHCAPVCC, 0x3C)) {
    Serial.println(F("SSD1306 allocation failed"));
    for(;;); // Don't proceed, loop forever
  }

  // Show initial display buffer contents on the screen --
  // the library initializes this with an Adafruit splash screen.
  display.display();
  delay(2000); // Pause for 2 seconds

  // Clear the buffer
  display.clearDisplay();

  // Draw a single pixel in white
  display.drawPixel(10, 10, WHITE);

  // Show the display buffer on the screen. You MUST call display() after
  // drawing commands to make them visible on screen!
  display.display();
  delay(2000);
  // display.display() is NOT necessary after every single drawing command,
  // unless that's what you want...rather, you can batch up a bunch of
  // drawing operations and then update the screen all at once by calling
  // display.display(). These examples demonstrate both approaches...

  testdrawline();      // Draw many lines

  testdrawrect();      // Draw rectangles (outlines)

  testfillrect();      // Draw rectangles (filled)

  testdrawcircle();    // Draw circles (outlines)

  testfillcircle();    // Draw circles (filled)

  testdrawroundrect(); // Draw rounded rectangles (outlines)

  testfillroundrect(); // Draw rounded rectangles (filled)

  testdrawtriangle();  // Draw triangles (outlines)

  testfilltriangle();  // Draw triangles (filled)

  testdrawchar();      // Draw characters of the default font

  testdrawstyles();    // Draw 'stylized' characters

  testscrolltext();    // Draw scrolling text

  testdrawbitmap();    // Draw a small bitmap image

  // Invert and restore display, pausing in-between
  display.invertDisplay(true);
  delay(1000);
  display.invertDisplay(false);
  delay(1000);

  testanimate(logo_bmp, LOGO_WIDTH, LOGO_HEIGHT); // Animate bitmaps
}

void loop() {
}

void testdrawline() {
  int16_t i;

  display.clearDisplay(); // Clear display buffer

  for(i=0; i<display.width(); i+=4) {
    display.drawLine(0, 0, i, display.height()-1, WHITE);
    display.display(); // Update screen with each newly-drawn line
    delay(1);
  }
  for(i=0; i<display.height(); i+=4) {
    display.drawLine(0, 0, display.width()-1, i, WHITE);
    display.display();
    delay(1);
  }
  delay(250);

  display.clearDisplay();

  for(i=0; i<display.width(); i+=4) {
    display.drawLine(0, display.height()-1, i, 0, WHITE);
    display.display();
    delay(1);
  }
  for(i=display.height()-1; i>=0; i-=4) {
    display.drawLine(0, display.height()-1, display.width()-1, i, WHITE);
    display.display();
    delay(1);
  }
  delay(250);

  display.clearDisplay();

  for(i=display.width()-1; i>=0; i-=4) {
    display.drawLine(display.width()-1, display.height()-1, i, 0, WHITE);
    display.display();
    delay(1);
  }
  for(i=display.height()-1; i>=0; i-=4) {
    display.drawLine(display.width()-1, display.height()-1, 0, i, WHITE);
    display.display();
    delay(1);
  }
  delay(250);

  display.clearDisplay();

  for(i=0; i<display.height(); i+=4) {
    display.drawLine(display.width()-1, 0, 0, i, WHITE);
    display.display();
    delay(1);
  }
  for(i=0; i<display.width(); i+=4) {
    display.drawLine(display.width()-1, 0, i, display.height()-1, WHITE);
    display.display();
    delay(1);
  }

  delay(2000); // Pause for 2 seconds
}

void testdrawrect(void) {
  display.clearDisplay();

  for(int16_t i=0; i<display.height()/2; i+=2) {
    display.drawRect(i, i, display.width()-2*i, display.height()-2*i, WHITE);
    display.display(); // Update screen with each newly-drawn rectangle
    delay(1);
  }

  delay(2000);
}

void testfillrect(void) {
  display.clearDisplay();

  for(int16_t i=0; i<display.height()/2; i+=3) {
    // The INVERSE color is used so rectangles alternate white/black
    display.fillRect(i, i, display.width()-i*2, display.height()-i*2, INVERSE);
    display.display(); // Update screen with each newly-drawn rectangle
    delay(1);
  }

  delay(2000);
}

void testdrawcircle(void) {
  display.clearDisplay();

  for(int16_t i=0; i<max(display.width(),display.height())/2; i+=2) {
    display.drawCircle(display.width()/2, display.height()/2, i, WHITE);
    display.display();
    delay(1);
  }

  delay(2000);
}

void testfillcircle(void) {
  display.clearDisplay();

  for(int16_t i=max(display.width(),display.height())/2; i>0; i-=3) {
    // The INVERSE color is used so circles alternate white/black
    display.fillCircle(display.width() / 2, display.height() / 2, i, INVERSE);
    display.display(); // Update screen with each newly-drawn circle
    delay(1);
  }

  delay(2000);
}

void testdrawroundrect(void) {
  display.clearDisplay();

  for(int16_t i=0; i<display.height()/2-2; i+=2) {
    display.drawRoundRect(i, i, display.width()-2*i, display.height()-2*i,
      display.height()/4, WHITE);
    display.display();
    delay(1);
  }

  delay(2000);
}

void testfillroundrect(void) {
  display.clearDisplay();

  for(int16_t i=0; i<display.height()/2-2; i+=2) {
    // The INVERSE color is used so round-rects alternate white/black
    display.fillRoundRect(i, i, display.width()-2*i, display.height()-2*i,
      display.height()/4, INVERSE);
    display.display();
    delay(1);
  }

  delay(2000);
}

void testdrawtriangle(void) {
  display.clearDisplay();

  for(int16_t i=0; i<max(display.width(),display.height())/2; i+=5) {
    display.drawTriangle(
      display.width()/2  , display.height()/2-i,
      display.width()/2-i, display.height()/2+i,
      display.width()/2+i, display.height()/2+i, WHITE);
    display.display();
    delay(1);
  }

  delay(2000);
}

void testfilltriangle(void) {
  display.clearDisplay();

  for(int16_t i=max(display.width(),display.height())/2; i>0; i-=5) {
    // The INVERSE color is used so triangles alternate white/black
    display.fillTriangle(
      display.width()/2  , display.height()/2-i,
      display.width()/2-i, display.height()/2+i,
      display.width()/2+i, display.height()/2+i, INVERSE);
    display.display();
    delay(1);
  }

  delay(2000);
}

void testdrawchar(void) {
  display.clearDisplay();

  display.setTextSize(1);      // Normal 1:1 pixel scale
  display.setTextColor(WHITE); // Draw white text
  display.setCursor(0, 0);     // Start at top-left corner
  display.cp437(true);         // Use full 256 char 'Code Page 437' font

  // Not all the characters will fit on the display. This is normal.
  // Library will draw what it can and the rest will be clipped.
  for(int16_t i=0; i<256; i++) {
    if(i == '\n') display.write(' ');
    else          display.write(i);
  }

  display.display();
  delay(2000);
}

void testdrawstyles(void) {
  display.clearDisplay();

  display.setTextSize(1);             // Normal 1:1 pixel scale
  display.setTextColor(WHITE);        // Draw white text
  display.setCursor(0,0);             // Start at top-left corner
  display.println(F("Hello, world!"));

  display.setTextColor(BLACK, WHITE); // Draw 'inverse' text
  display.println(3.141592);

  display.setTextSize(2);             // Draw 2X-scale text
  display.setTextColor(WHITE);
  display.print(F("0x")); display.println(0xDEADBEEF, HEX);

  display.display();
  delay(2000);
}

void testscrolltext(void) {
  display.clearDisplay();

  display.setTextSize(2); // Draw 2X-scale text
  display.setTextColor(WHITE);
  display.setCursor(10, 0);
  display.println(F("scroll"));
  display.display();      // Show initial text
  delay(100);

  // Scroll in various directions, pausing in-between:
  display.startscrollright(0x00, 0x0F);
  delay(2000);
  display.stopscroll();
  delay(1000);
  display.startscrollleft(0x00, 0x0F);
  delay(2000);
  display.stopscroll();
  delay(1000);
  display.startscrolldiagright(0x00, 0x07);
  delay(2000);
  display.startscrolldiagleft(0x00, 0x07);
  delay(2000);
  display.stopscroll();
  delay(1000);
}

void testdrawbitmap(void) {
  display.clearDisplay();

  display.drawBitmap(
    (display.width()  - LOGO_WIDTH ) / 2,
    (display.height() - LOGO_HEIGHT) / 2,
    logo_bmp, LOGO_WIDTH, LOGO_HEIGHT, 1);
  display.display();
  delay(1000);
}

#define XPOS   0 // Indexes into the 'icons' array in function below
#define YPOS   1
#define DELTAY 2

void testanimate(const uint8_t *bitmap, uint8_t w, uint8_t h) {
  int8_t f, icons[NUMFLAKES][3];

  // Initialize 'snowflake' positions
  for(f=0; f< NUMFLAKES; f++) {
    icons[f][XPOS]   = random(1 - LOGO_WIDTH, display.width());
    icons[f][YPOS]   = -LOGO_HEIGHT;
    icons[f][DELTAY] = random(1, 6);
    Serial.print(F("x: "));
    Serial.print(icons[f][XPOS], DEC);
    Serial.print(F(" y: "));
    Serial.print(icons[f][YPOS], DEC);
    Serial.print(F(" dy: "));
    Serial.println(icons[f][DELTAY], DEC);
  }

  for(;;) { // Loop forever...
    display.clearDisplay(); // Clear the display buffer

    // Draw each snowflake:
    for(f=0; f< NUMFLAKES; f++) {
      display.drawBitmap(icons[f][XPOS], icons[f][YPOS], bitmap, w, h, WHITE);
    }

    display.display(); // Show the display buffer on the screen
    delay(200);        // Pause for 1/10 second

    // Then update coordinates of each flake...
    for(f=0; f< NUMFLAKES; f++) {
      icons[f][YPOS] += icons[f][DELTAY];
      // If snowflake is off the bottom of the screen...
      if (icons[f][YPOS] >= display.height()) {
        // Reinitialize to a random position, just off the top
        icons[f][XPOS]   = random(1 - LOGO_WIDTH, display.width());
        icons[f][YPOS]   = -LOGO_HEIGHT;
        icons[f][DELTAY] = random(1, 6);
      }
    }
  }
}
Si tu OLED no tiene pin RESET, debes fijar la variable OLED_RESET en -1 como se muestra a continuación:
#define OLED_RESET -1 // Reset pin # (or -1 if sharing Arduino reset pin)
Sube el código a tu tarjeta Arduino. No olvides seleccionar la tarjeta y el puerto COM correctos en el menú Tools.
Deberías ver una serie de animaciones diferentes en la OLED, como se muestra en el siguiente video corto.
Si tu pantalla OLED no muestra nada:
- Verifica que la pantalla OLED esté cableada correctamente al Arduino
- Comprueba de nuevo la dirección I2C de la pantalla OLED: con la OLED conectada al Arduino, sube este código y revisa la dirección I2C en el Monitor Serial
Debes cambiar la dirección de la OLED en la siguiente línea, si es necesario. En nuestro caso, la dirección es 0x3C.
if(!display.begin(SSD1306_SWITCHCAPVCC, 0x3C)) { Escribir texto – Pantalla OLED
La biblioteca de Adafruit para la pantalla OLED incluye varias funciones para escribir texto. En esta sección aprenderás a escribir y desplazar texto usando las funciones de la biblioteca.
“Hello, world!” en la pantalla OLED
El siguiente sketch muestra el mensaje Hello, world! en la pantalla OLED.
/*********
  Rui Santos
  Complete project details at https://randomnerdtutorials.com
*********/

#include <Wire.h>
#include <Adafruit_GFX.h>
#include <Adafruit_SSD1306.h>

#define SCREEN_WIDTH 128 // OLED display width, in pixels
#define SCREEN_HEIGHT 64 // OLED display height, in pixels

// Declaration for an SSD1306 display connected to I2C (SDA, SCL pins)
Adafruit_SSD1306 display(SCREEN_WIDTH, SCREEN_HEIGHT, &Wire, -1);

void setup() {
  Serial.begin(115200);

  if(!display.begin(SSD1306_SWITCHCAPVCC, 0x3C)) { // Address 0x3D for 128x64
    Serial.println(F("SSD1306 allocation failed"));
    for(;;);
  }
  delay(2000);
  display.clearDisplay();

  display.setTextSize(1);
  display.setTextColor(WHITE);
  display.setCursor(0, 10);
  // Display static text
  display.println("Hello, world!");
  display.display();
}

void loop() {

}
Después de subir el código, esto es lo que obtendrás en tu OLED:

Veamos rápidamente cómo funciona el código.
Importar bibliotecas
Primero, necesitas importar las bibliotecas necesarias. La biblioteca Wire para usar I2C y las bibliotecas de Adafruit para escribir en la pantalla: Adafruit_GFX y Adafruit_SSD1306.
#include <Wire.h>
#include <Adafruit_GFX.h>
#include <Adafruit_SSD1306.h>
Inicializar la pantalla OLED
Luego, defines el ancho y el alto de tu OLED. En este ejemplo usamos una pantalla OLED de 128×64. Si usas otros tamaños, puedes cambiarlo en las variables SCREEN_WIDTH y SCREEN_HEIGHT.
#define SCREEN_WIDTH 128 // OLED display width, in pixels
#define SCREEN_HEIGHT 64 // OLED display height, in pixels
Después, inicializa un objeto display con el ancho y el alto definidos antes, usando el protocolo de comunicación I2C (&Wire).
Adafruit_SSD1306 display(SCREEN_WIDTH, SCREEN_HEIGHT, &Wire, -1);El parámetro (-1) significa que tu pantalla OLED no tiene pin RESET. Si tu pantalla OLED sí tiene pin RESET, debe conectarse a un GPIO. En ese caso, debes pasar el número de GPIO como parámetro.
En el setup(), inicializa el Monitor Serial a una velocidad de 115200 baudios con fines de depuración.
Serial.begin(115200);Inicializa la pantalla OLED con el método begin() de la siguiente manera:
if(!display.begin(SSD1306_SWITCHCAPVCC, 0x3C)) {
  Serial.println("SSD1306 allocation failed");
  for(;;); // Don't proceed, loop forever
}
Este fragmento también imprime un mensaje en el Monitor Serial en caso de que no podamos conectarnos con la pantalla.
Serial.println("SSD1306 allocation failed");En caso de que uses una pantalla OLED diferente, es posible que debas cambiar la dirección de la OLED. En nuestro caso, la dirección es 0x3C.
if(!display.begin(SSD1306_SWITCHCAPVCC, 0x3C)) { Si esta dirección no funciona, puedes ejecutar un sketch escáner I2C para encontrar la dirección de tu OLED. Puedes encontrar aquí el sketch escáner I2C.
Después de inicializar la pantalla, agrega un retardo de dos segundos para que la OLED tenga tiempo suficiente de inicializarse antes de escribir texto:
delay(2000);Limpiar la pantalla, definir tamaño de fuente, color y escribir texto
Después de inicializar la pantalla, limpia el búfer de la pantalla con el método clearDisplay():
display.clearDisplay();Antes de escribir texto, necesitas definir el tamaño del texto, el color y dónde se mostrará el texto en la OLED.
Define el tamaño de la fuente usando el método setTextSize():
display.setTextSize(1); Define el color de la fuente con el método setTextColor():
display.setTextColor(WHITE); WHITE define fuente blanca y fondo negro.
Define la posición donde empieza el texto usando el método setCursor(x,y). En este caso, indicamos que el texto empiece en las coordenadas (0,10).
display.setCursor(0,10); Finalmente, puedes enviar el texto a la pantalla usando el método println(), de la siguiente manera:
display.println("Hello, world!");Luego, necesitas llamar al método display() para que el texto se muestre realmente en la pantalla.
display.display();Texto en movimiento (scroll)
La biblioteca OLED de Adafruit proporciona métodos útiles para desplazar texto fácilmente.
- startscrollright(0x00, 0x0F): desplaza el texto de izquierda a derecha
- startscrollleft(0x00, 0x0F): desplaza el texto de derecha a izquierda
- startscrolldiagright(0x00, 0x07): desplaza el texto de la esquina inferior izquierda a la esquina superior derecha
- startscrolldiagleft(0x00, 0x07): desplaza el texto de la esquina inferior derecha a la esquina superior izquierda
El siguiente sketch implementa esos métodos.
/*********
  Rui Santos
  Complete project details at https://randomnerdtutorials.com
*********/

#include <Wire.h>
#include <Adafruit_GFX.h>
#include <Adafruit_SSD1306.h>

#define SCREEN_WIDTH 128 // OLED display width, in pixels
#define SCREEN_HEIGHT 64 // OLED display height, in pixels

// Declaration for an SSD1306 display connected to I2C (SDA, SCL pins)
Adafruit_SSD1306 display(SCREEN_WIDTH, SCREEN_HEIGHT, &Wire, -1);

void setup() {
  Serial.begin(115200);

  if(!display.begin(SSD1306_SWITCHCAPVCC, 0x3C)) { // Address 0x3D for 128x64
    Serial.println(F("SSD1306 allocation failed"));
    for(;;);
  }
  delay(2000);
  display.clearDisplay();

  display.setTextSize(1);
  display.setTextColor(WHITE);
  display.setCursor(0, 0);
  // Display static text
  display.println("Scrolling Hello");
  display.display();
  delay(100);

}

void loop() {
  // Scroll in various directions, pausing in-between:
  display.startscrollright(0x00, 0x0F);
  delay(2000);
  display.stopscroll();
  delay(1000);
  display.startscrollleft(0x00, 0x0F);
  delay(2000);
  display.stopscroll();
  delay(1000);
  display.startscrolldiagright(0x00, 0x07);
  delay(2000);
  display.startscrolldiagleft(0x00, 0x07);
  delay(2000);
  display.stopscroll();
  delay(1000);
}
El texto se desplaza como se muestra en el siguiente video corto.
Usar otras fuentes – Pantalla OLED
La biblioteca Adafruit GFX nos permite usar algunas fuentes alternativas además de las fuentes integradas. Permite elegir entre Serif, Sans y Mono. Cada fuente está disponible en negrita, cursiva y en diferentes tamaños.
Los tamaños los define la propia fuente. Por lo tanto, el método setTextSize() no funciona con estas fuentes. Las fuentes están disponibles en tamaños de 9, 12, 18 y 24 puntos y también contienen caracteres de 7 bits (códigos ASCII) (descritos como 7b en el nombre de la fuente).
Puedes elegir de la siguiente selección de fuentes:
FreeMono12pt7b.h		FreeSansBoldOblique12pt7b.h
FreeMono18pt7b.h		FreeSansBoldOblique18pt7b.h
FreeMono24pt7b.h		FreeSansBoldOblique24pt7b.h
FreeMono9pt7b.h			FreeSansBoldOblique9pt7b.h
FreeMonoBold12pt7b.h		FreeSansOblique12pt7b.h
FreeMonoBold18pt7b.h		FreeSansOblique18pt7b.h
FreeMonoBold24pt7b.h		FreeSansOblique24pt7b.h
FreeMonoBold9pt7b.h		FreeSansOblique9pt7b.h
FreeMonoBoldOblique12pt7b.h	FreeSerif12pt7b.h
FreeMonoBoldOblique18pt7b.h	FreeSerif18pt7b.h
FreeMonoBoldOblique24pt7b.h	FreeSerif24pt7b.h
FreeMonoBoldOblique9pt7b.h	FreeSerif9pt7b.h
FreeMonoOblique12pt7b.h		FreeSerifBold12pt7b.h
FreeMonoOblique18pt7b.h		FreeSerifBold18pt7b.h
FreeMonoOblique24pt7b.h		FreeSerifBold24pt7b.h
FreeMonoOblique9pt7b.h		FreeSerifBold9pt7b.h
FreeSans12pt7b.h		FreeSerifBoldItalic12pt7b.h
FreeSans18pt7b.h		FreeSerifBoldItalic18pt7b.h
FreeSans24pt7b.h		FreeSerifBoldItalic24pt7b.h
FreeSans9pt7b.h			FreeSerifBoldItalic9pt7b.h
FreeSansBold12pt7b.h		FreeSerifItalic12pt7b.h
FreeSansBold18pt7b.h		FreeSerifItalic18pt7b.h
FreeSansBold24pt7b.h		FreeSerifItalic24pt7b.h
FreeSansBold9pt7b.h		FreeSerifItalic9pt7b.h
Las fuentes que funcionan mejor con la pantalla OLED son las de tamaño 9 y 12 puntos.
Para usar una de esas fuentes, primero necesitas incluirla en tu sketch, por ejemplo:
#include <Fonts/FreeSerif12pt7b.h>Después, solo necesitas usar el método setFont() y pasarle como argumento la fuente especificada:
display.setFont(&FreeSerif12pt7b);Después de especificar la fuente, todos los métodos para escribir texto usarán esa fuente. Para volver a usar la fuente original, solo necesitas llamar al método setFont() sin argumentos:
display.setFont();Sube el siguiente sketch a tu tarjeta:
/*********
  Rui Santos
  Complete project details at https://randomnerdtutorials.com
*********/

#include <Wire.h>
#include <Adafruit_GFX.h>
#include <Adafruit_SSD1306.h>
#include <Fonts/FreeSerif9pt7b.h>

#define SCREEN_WIDTH 128 // OLED display width, in pixels
#define SCREEN_HEIGHT 64 // OLED display height, in pixels

// Declaration for an SSD1306 display connected to I2C (SDA, SCL pins)
Adafruit_SSD1306 display(SCREEN_WIDTH, SCREEN_HEIGHT, &Wire, -1);

void setup() {
  Serial.begin(115200);

  if(!display.begin(SSD1306_SWITCHCAPVCC, 0x3C)) {
    Serial.println("SSD1306 allocation failed");
    for(;;);
  }
  delay(2000);

  display.setFont(&FreeSerif9pt7b);
  display.clearDisplay();
  display.setTextSize(1);
  display.setTextColor(WHITE);
  display.setCursor(0,20);
  display.println("Hello, world!");
  display.display();
  delay(2000);
}
void loop() {

}
Ahora tu pantalla imprime el mensaje “Hello, world!” en la fuente FreeSerif.

Dibujar figuras en la pantalla OLED
La biblioteca OLED de Adafruit proporciona métodos útiles para dibujar pixeles, líneas y figuras. Veamos rápidamente esos métodos.
Dibujar un pixel

Para dibujar un pixel en la pantalla OLED, puedes usar el método drawPixel(x, y, color) que acepta como argumentos las coordenadas x e y donde aparece el pixel, y el color. Por ejemplo:
display.drawPixel(64, 32, WHITE);Dibujar una línea

Usa el método drawLine(x1, y1, x2, y2, color) para crear una línea. Las coordenadas (x1, y1) indican el inicio de la línea, y las coordenadas (x2, y2) indican dónde termina. Por ejemplo:
display.drawLine(0, 0, 127, 20, WHITE);Dibujar un rectángulo

El método drawRect(x, y, width, height, color) ofrece una forma fácil de dibujar un rectángulo. Las coordenadas (x, y) indican la esquina superior izquierda del rectángulo. Luego, necesitas especificar el ancho, el alto y el color:
display.drawRect(10, 10, 50, 30, WHITE);Puedes usar fillRect(x, y, width, height, color) para dibujar un rectángulo relleno. Este método acepta los mismos argumentos que drawRect().

La biblioteca también proporciona métodos para mostrar rectángulos con esquinas redondeadas: drawRoundRect() y fillRoundRect(). Estos métodos aceptan los mismos argumentos que los anteriores más el radio de la esquina. Por ejemplo:
display.drawRoundRect(10, 10, 30, 50, 2, WHITE);
O un rectángulo redondeado relleno:
display.fillRoundRect(10, 10, 30, 50, 2, WHITE);
Dibujar un círculo

Para dibujar un círculo usa el método drawCircle(x, y, radius, color). Las coordenadas (x,y) indican el centro del círculo. También debes pasar el radio como argumento. Por ejemplo:
display.drawCircle(64, 32, 10, WHITE);De la misma manera, para construir un círculo relleno, usa el método fillCircle() con los mismos argumentos:
display.fillCircle(64, 32, 10, WHITE);
Dibujar un triángulo

Usa el método drawTriangle(x1, y1, x2, y2, x3, y3, color) para construir un triángulo. Este método acepta como argumentos las coordenadas de cada vértice y el color.
display.drawTriangle(10, 10, 55, 20, 5, 40, WHITE);Usa el método fillTriangle() para dibujar un triángulo relleno.
display.fillTriangle(10, 10, 55, 20, 5, 40, WHITE);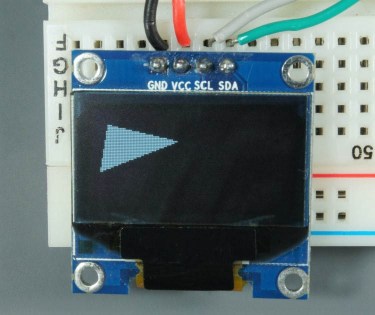
Invertir
La biblioteca proporciona un método adicional que puedes usar con figuras o texto: el método invertDisplay(). Pasa true como argumento para invertir los colores de la pantalla o false para volver a los colores originales.
Si llamas al siguiente comando después de definir el triángulo:
display.invertDisplay(true);Obtendrás un triángulo invertido, como se muestra a continuación:

Código – Dibujar figuras
Sube el siguiente sketch que implementa cada fragmento de código que hemos visto antes y recorre todas las figuras.
/*********
  Rui Santos
  Complete project details at https://randomnerdtutorials.com
*********/

#include <Wire.h>
#include <Adafruit_GFX.h>
#include <Adafruit_SSD1306.h>

#define SCREEN_WIDTH 128
#define SCREEN_HEIGHT 64

// Declaration for an SSD1306 display connected to I2C (SDA, SCL pins)
Adafruit_SSD1306 display(SCREEN_WIDTH, SCREEN_HEIGHT, &Wire, -1);

void setup() {
  Serial.begin(115200);

  if(!display.begin(SSD1306_SWITCHCAPVCC, 0x3C)) {
    Serial.println(F("SSD1306 allocation failed"));
    for(;;);
  }
  delay(2000); // Pause for 2 seconds

  // Clear the buffer
  display.clearDisplay();

  // Draw a single pixel in white
  display.drawPixel(64, 32, WHITE);
  display.display();
  delay(3000);

  // Draw line
  display.clearDisplay();
  display.drawLine(0, 0, 127, 20, WHITE);
  display.display();
  delay(3000);

  // Draw rectangle
  display.clearDisplay();
  display.drawRect(30, 10, 50, 30, WHITE);
  display.display();
  delay(3000);
  // Fill rectangle
  display.fillRect(30, 10, 50, 30, WHITE);
  display.display();
  delay(3000);

  // Draw round rectangle
  display.clearDisplay();
  display.drawRoundRect(10, 10, 30, 50, 2, WHITE);
  display.display();
  delay(3000);
  // Fill round rectangle
  display.clearDisplay();
  display.fillRoundRect(10, 10, 30, 50, 2, WHITE);
  display.display();
  delay(3000);

  // Draw circle
  display.clearDisplay();
  display.drawCircle(64, 32, 10, WHITE);
  display.display();
  delay(3000);
  // Fill circle
  display.fillCircle(64, 32, 10, WHITE);
  display.display();
  delay(3000);

  // Draw triangle
  display.clearDisplay();
  display.drawTriangle(10, 10, 55, 20, 5, 40, WHITE);
  display.display();
  delay(3000);
  // Fill triangle
  display.fillTriangle(10, 10, 55, 20, 5, 40, WHITE);
  display.display();
  delay(3000);

  // Invert and restore display, pausing in-between
  display.invertDisplay(true);
  delay(3000);
  display.invertDisplay(false);
  delay(3000);
}

void loop() {

}
Mostrar imágenes en mapa de bits en la OLED
Puedes mostrar imágenes en mapa de bits monocromáticas de 128×64 en la pantalla OLED.
Primero, usa un programa de imágenes para redimensionar una foto o imagen y guárdala como mapa de bits monocromático. Si estás en una PC con Windows, puedes usar Paint.

Luego, usa un conversor de imagen a arreglo C para convertir la imagen en un arreglo. Yo usé LCD Image Converter.
Ejecuta el programa y comienza con una nueva imagen. Ve a Image > Import y selecciona la imagen en mapa de bits que creaste antes.

Ve a Options > Conversion y en la pestaña Prepare selecciona las siguientes opciones:
- Type: Monochrome, Threshold Dither
- Main Scan Direction: Top to Bottom
- Line Scan Direction: Forward

Ve a la pestaña Image y selecciona las siguientes opciones:
- Split to rows
- Block size: 8 bit
- Byte order: Little-Endian

Luego, haz clic en OK. Finalmente, en el menú principal, ve a File > Convert. Debería guardarse un nuevo archivo con extensión .c. Ese archivo contiene el arreglo C de la imagen. Abre ese archivo con un editor de texto y copia el arreglo.
En nuestro caso, este es el arreglo que obtenemos:
static const uint8_t image_data_Saraarray[1024] = {
    0xff, 0xff, 0xff, 0xff, 0xff, 0xff, 0xfe, 0x00, 0x00, 0x00, 0x1f, 0xff, 0xff, 0xff, 0xff, 0xff,
    0xff, 0xff, 0xff, 0xff, 0xff, 0xff, 0xf8, 0x00, 0x00, 0x00, 0x0f, 0xff, 0xff, 0xff, 0xff, 0xff,
    0xff, 0xff, 0xff, 0xff, 0xff, 0xff, 0xf8, 0x00, 0x00, 0x00, 0x07, 0xff, 0xff, 0xff, 0xff, 0xff,
    0xff, 0xff, 0xff, 0xff, 0xff, 0xff, 0xf0, 0x00, 0x00, 0x00, 0x07, 0xff, 0xff, 0xff, 0xff, 0xff,
    0xff, 0xff, 0xff, 0xff, 0xff, 0xff, 0xe0, 0x00, 0x00, 0x00, 0x03, 0xff, 0xff, 0xff, 0xff, 0xff,
    0xff, 0xff, 0xff, 0xff, 0xff, 0xff, 0xc0, 0x00, 0x00, 0x00, 0x01, 0xff, 0xff, 0xff, 0xff, 0xff,
    0xff, 0xff, 0xff, 0xff, 0xff, 0xff, 0x80, 0x00, 0x00, 0x00, 0x01, 0xff, 0xff, 0xff, 0xff, 0xff,
    0xff, 0xff, 0xff, 0xff, 0xff, 0xff, 0x80, 0x00, 0x00, 0x00, 0x00, 0xff, 0xff, 0xff, 0xff, 0xff,
    0xff, 0xff, 0xff, 0xff, 0xff, 0xff, 0x00, 0x00, 0x00, 0x00, 0x00, 0x7f, 0xff, 0xff, 0xff, 0xff,
    0xff, 0xff, 0xff, 0xff, 0xff, 0xfe, 0x00, 0x00, 0x00, 0x00, 0x00, 0x3f, 0xff, 0xff, 0xff, 0xff,
    0xff, 0xff, 0xff, 0xff, 0xff, 0xfc, 0x00, 0x00, 0x00, 0x00, 0x00, 0x3f, 0xff, 0xff, 0xff, 0xff,
    0xff, 0xff, 0xff, 0xff, 0xff, 0xfc, 0x00, 0x00, 0x00, 0x00, 0x00, 0x1f, 0xff, 0xff, 0xff, 0xff,
    0xff, 0xff, 0xff, 0xff, 0xff, 0xfc, 0x00, 0x00, 0x00, 0x00, 0x00, 0x1f, 0xff, 0xff, 0xff, 0xff,
    0xff, 0xff, 0xff, 0xff, 0xff, 0xfc, 0x00, 0x00, 0x00, 0x0a, 0x00, 0x1f, 0xff, 0xff, 0xff, 0xff,
    0xff, 0xff, 0xff, 0xff, 0xff, 0xfc, 0x00, 0x00, 0x14, 0x9e, 0x00, 0x1f, 0xff, 0xff, 0xff, 0xff,
    0xff, 0xff, 0xff, 0xff, 0xff, 0xfc, 0x00, 0x00, 0x36, 0x3f, 0x00, 0x1f, 0xff, 0xff, 0xff, 0xff,
    0xff, 0xff, 0xff, 0xff, 0xff, 0xfc, 0x00, 0x00, 0x6d, 0xff, 0x00, 0x1f, 0xff, 0xff, 0xff, 0xff,
    0xff, 0xff, 0xff, 0xff, 0xff, 0xfc, 0x00, 0x00, 0xfb, 0xff, 0x80, 0x1f, 0xff, 0xff, 0xff, 0xff,
    0xff, 0xff, 0xff, 0xff, 0xff, 0xfc, 0x00, 0x03, 0xd7, 0xff, 0x80, 0x0f, 0xff, 0xff, 0xff, 0xff,
    0xff, 0xff, 0xff, 0xff, 0xff, 0xf8, 0x00, 0x07, 0xef, 0xff, 0x80, 0x07, 0xff, 0xff, 0xff, 0xff,
    0xff, 0xff, 0xff, 0xff, 0xff, 0xf8, 0x00, 0x0f, 0xdf, 0xff, 0x90, 0x07, 0xff, 0xff, 0xff, 0xff,
    0xff, 0xff, 0xff, 0xff, 0xff, 0xf8, 0x00, 0x0f, 0xbf, 0xff, 0xd0, 0x07, 0xff, 0xff, 0xff, 0xff,
    0xff, 0xff, 0xff, 0xff, 0xff, 0xf0, 0x00, 0x1d, 0x7f, 0xff, 0xd0, 0x07, 0xff, 0xff, 0xff, 0xff,
    0xff, 0xff, 0xff, 0xff, 0xff, 0xf0, 0x01, 0x1b, 0xff, 0xff, 0xc0, 0x07, 0xff, 0xff, 0xff, 0xff,
    0xff, 0xff, 0xff, 0xff, 0xff, 0xf0, 0x02, 0xa7, 0xff, 0xff, 0xc0, 0x07, 0xff, 0xff, 0xff, 0xff,
    0xff, 0xff, 0xff, 0xff, 0xff, 0xe0, 0x00, 0x03, 0xff, 0xc0, 0x00, 0x07, 0xff, 0xff, 0xff, 0xff,
    0xff, 0xff, 0xff, 0xff, 0xff, 0xe0, 0x00, 0x00, 0xff, 0x80, 0x00, 0x0b, 0xff, 0xff, 0xff, 0xff,
    0xff, 0xff, 0xff, 0xff, 0xff, 0xc0, 0x03, 0xff, 0xff, 0xff, 0xf0, 0x0f, 0xff, 0xff, 0xff, 0xff,
    0xff, 0xff, 0xff, 0xff, 0xff, 0x80, 0x07, 0xff, 0xff, 0xff, 0xf0, 0x0f, 0xff, 0xff, 0xff, 0xff,
    0xff, 0xff, 0xff, 0xff, 0xff, 0x00, 0x0f, 0x07, 0xff, 0xf8, 0xf8, 0x03, 0xff, 0xff, 0xff, 0xff,
    0xff, 0xff, 0xff, 0xff, 0xff, 0x00, 0x0e, 0x01, 0xff, 0xc0, 0x38, 0x07, 0xff, 0xff, 0xff, 0xff,
    0xff, 0xff, 0xff, 0xff, 0xff, 0x00, 0x1c, 0x46, 0xff, 0xb1, 0x18, 0x07, 0xff, 0xff, 0xff, 0xff,
    0xff, 0xff, 0xff, 0xff, 0xfe, 0x00, 0x3f, 0x97, 0xff, 0xc0, 0x7a, 0x07, 0xff, 0xff, 0xff, 0xff,
    0xff, 0xff, 0xff, 0xff, 0xfe, 0x00, 0x3f, 0xff, 0xff, 0xff, 0xfe, 0x03, 0xff, 0xff, 0xff, 0xff,
    0xff, 0xff, 0xff, 0xff, 0xfe, 0x00, 0x3f, 0xff, 0xff, 0xff, 0xfe, 0x03, 0xff, 0xff, 0xff, 0xff,
    0xff, 0xff, 0xff, 0xff, 0xfe, 0x01, 0x3f, 0xff, 0xff, 0xff, 0xfe, 0x01, 0xff, 0xff, 0xff, 0xff,
    0xff, 0xff, 0xff, 0xff, 0xfe, 0x01, 0xbf, 0xff, 0xff, 0xff, 0xfe, 0x81, 0xff, 0xff, 0xff, 0xff,
    0xff, 0xff, 0xff, 0xff, 0xfc, 0x00, 0xbf, 0xff, 0xff, 0xff, 0xfc, 0x81, 0xff, 0xff, 0xff, 0xff,
    0xff, 0xff, 0xff, 0xff, 0xfc, 0x00, 0xff, 0xff, 0xfe, 0xff, 0xfd, 0x83, 0xff, 0xff, 0xff, 0xff,
    0xff, 0xff, 0xff, 0xff, 0xf8, 0x00, 0xbf, 0xff, 0xfe, 0xff, 0xfd, 0x01, 0xff, 0xff, 0xff, 0xff,
    0xff, 0xff, 0xff, 0xff, 0xf8, 0x00, 0x7f, 0xff, 0xff, 0xff, 0xff, 0x01, 0xff, 0xff, 0xff, 0xff,
    0xff, 0xff, 0xff, 0xff, 0xf0, 0x00, 0x7f, 0xff, 0xff, 0xff, 0xfb, 0x03, 0xff, 0xff, 0xff, 0xff,
    0xff, 0xff, 0xff, 0xff, 0xe0, 0x00, 0x3f, 0xff, 0xdc, 0xff, 0xfa, 0x03, 0xff, 0xff, 0xff, 0xff,
    0xff, 0xff, 0xff, 0xff, 0xd8, 0x00, 0x1f, 0xff, 0xff, 0xff, 0xf8, 0x03, 0xff, 0xff, 0xff, 0xff,
    0xff, 0xff, 0xff, 0xff, 0xd0, 0x00, 0x1f, 0xff, 0xff, 0xff, 0xf8, 0x01, 0xff, 0xff, 0xff, 0xff,
    0xff, 0xff, 0xff, 0xff, 0x90, 0x00, 0x1f, 0xff, 0xff, 0xff, 0xf8, 0x02, 0xff, 0xff, 0xff, 0xff,
    0xff, 0xff, 0xff, 0xff, 0xb0, 0x00, 0x0f, 0xf5, 0xff, 0xd7, 0xf8, 0x01, 0xff, 0xff, 0xff, 0xff,
    0xff, 0xff, 0xff, 0xff, 0xb0, 0x00, 0x0f, 0xff, 0xff, 0xff, 0xf8, 0x00, 0x5f, 0xff, 0xff, 0xff,
    0xff, 0xff, 0xff, 0xff, 0xa0, 0x00, 0x0f, 0xfb, 0xff, 0xff, 0xf0, 0x00, 0x3f, 0xff, 0xff, 0xff,
    0xff, 0xff, 0xff, 0xff, 0x80, 0x00, 0x0f, 0xfd, 0xff, 0xdf, 0xf0, 0x00, 0x3f, 0xff, 0xff, 0xff,
    0xff, 0xff, 0xff, 0xff, 0x80, 0x00, 0x07, 0xff, 0xff, 0xbf, 0xf0, 0x00, 0x0f, 0xff, 0xff, 0xff,
    0xff, 0xff, 0xff, 0xff, 0x80, 0x00, 0x07, 0xff, 0xff, 0xff, 0xe0, 0x00, 0x87, 0xff, 0xff, 0xff,
    0xff, 0xff, 0xff, 0xff, 0x80, 0x00, 0x03, 0xff, 0xff, 0xff, 0xc0, 0x00, 0x43, 0xff, 0xff, 0xff,
    0xff, 0xff, 0xff, 0xff, 0x60, 0x00, 0x01, 0xff, 0xff, 0xff, 0xc0, 0x00, 0x73, 0xff, 0xff, 0xff,
    0xff, 0xff, 0xff, 0xfe, 0xe0, 0x00, 0x00, 0xff, 0xff, 0xff, 0x80, 0x00, 0x7b, 0xff, 0xff, 0xff,
    0xff, 0xff, 0xff, 0xfd, 0xe0, 0x00, 0x00, 0x7f, 0xff, 0xfe, 0x00, 0x00, 0x33, 0xff, 0xff, 0xff,
    0xff, 0xff, 0xff, 0xfd, 0xe0, 0x00, 0x00, 0x3f, 0xff, 0xf8, 0x00, 0x00, 0x27, 0xff, 0xff, 0xff,
    0xff, 0xff, 0xff, 0xff, 0xe0, 0x00, 0x00, 0x0f, 0xff, 0xf0, 0x00, 0x00, 0x0f, 0xff, 0xff, 0xff,
    0xff, 0xff, 0xff, 0xff, 0x60, 0x00, 0x00, 0x67, 0xff, 0xe0, 0x00, 0x00, 0x1b, 0xff, 0xff, 0xff,
    0xff, 0xff, 0xff, 0xfd, 0x40, 0x00, 0x00, 0xf3, 0xff, 0xc4, 0x00, 0x00, 0x0b, 0xff, 0xff, 0xff,
    0xff, 0xff, 0xff, 0xfe, 0x80, 0x00, 0x00, 0xfc, 0xff, 0x8c, 0x00, 0x00, 0x03, 0xff, 0xff, 0xff,
    0xff, 0xff, 0xff, 0xfe, 0x00, 0x00, 0x00, 0x7f, 0x3c, 0x3c, 0x00, 0x00, 0x07, 0xff, 0xff, 0xff,
    0xff, 0xff, 0xff, 0xff, 0x00, 0x00, 0x00, 0x3f, 0xc0, 0x7c, 0x00, 0x00, 0x03, 0xff, 0xff, 0xff,
    0xff, 0xff, 0xff, 0xff, 0x00, 0x00, 0x00, 0x1f, 0xff, 0xfc, 0x00, 0x00, 0x03, 0xff, 0xff, 0xff
};
Copia tu arreglo en el sketch. Luego, para mostrar el arreglo, usa el método drawBitmap() que acepta los siguientes argumentos (x, y, arreglo de la imagen, ancho de la imagen, alto de la imagen, rotación). Las coordenadas (x, y) definen dónde comienza a mostrarse la imagen.
Copia el código de abajo para mostrar tu imagen en mapa de bits en la OLED.
/*********
  Rui Santos
  Complete project details at https://randomnerdtutorials.com
*********/

#include <Wire.h>
#include <Adafruit_GFX.h>
#include <Adafruit_SSD1306.h>

#define SCREEN_WIDTH 128
#define SCREEN_HEIGHT 64

Adafruit_SSD1306 display(SCREEN_WIDTH, SCREEN_HEIGHT, &Wire, -1);

static const unsigned char PROGMEM image_data_Saraarray[] = {
    0xff, 0xff, 0xff, 0xff, 0xff, 0xff, 0xfe, 0x00, 0x00, 0x00, 0x1f, 0xff, 0xff, 0xff, 0xff, 0xff,
    0xff, 0xff, 0xff, 0xff, 0xff, 0xff, 0xf8, 0x00, 0x00, 0x00, 0x0f, 0xff, 0xff, 0xff, 0xff, 0xff,
    0xff, 0xff, 0xff, 0xff, 0xff, 0xff, 0xf8, 0x00, 0x00, 0x00, 0x07, 0xff, 0xff, 0xff, 0xff, 0xff,
    0xff, 0xff, 0xff, 0xff, 0xff, 0xff, 0xf0, 0x00, 0x00, 0x00, 0x07, 0xff, 0xff, 0xff, 0xff, 0xff,
    0xff, 0xff, 0xff, 0xff, 0xff, 0xff, 0xe0, 0x00, 0x00, 0x00, 0x03, 0xff, 0xff, 0xff, 0xff, 0xff,
    0xff, 0xff, 0xff, 0xff, 0xff, 0xff, 0xc0, 0x00, 0x00, 0x00, 0x01, 0xff, 0xff, 0xff, 0xff, 0xff,
    0xff, 0xff, 0xff, 0xff, 0xff, 0xff, 0x80, 0x00, 0x00, 0x00, 0x01, 0xff, 0xff, 0xff, 0xff, 0xff,
    0xff, 0xff, 0xff, 0xff, 0xff, 0xff, 0x80, 0x00, 0x00, 0x00, 0x00, 0xff, 0xff, 0xff, 0xff, 0xff,
    0xff, 0xff, 0xff, 0xff, 0xff, 0xff, 0x00, 0x00, 0x00, 0x00, 0x00, 0x7f, 0xff, 0xff, 0xff, 0xff,
    0xff, 0xff, 0xff, 0xff, 0xff, 0xfe, 0x00, 0x00, 0x00, 0x00, 0x00, 0x3f, 0xff, 0xff, 0xff, 0xff,
    0xff, 0xff, 0xff, 0xff, 0xff, 0xfc, 0x00, 0x00, 0x00, 0x00, 0x00, 0x3f, 0xff, 0xff, 0xff, 0xff,
    0xff, 0xff, 0xff, 0xff, 0xff, 0xfc, 0x00, 0x00, 0x00, 0x00, 0x00, 0x1f, 0xff, 0xff, 0xff, 0xff,
    0xff, 0xff, 0xff, 0xff, 0xff, 0xfc, 0x00, 0x00, 0x00, 0x00, 0x00, 0x1f, 0xff, 0xff, 0xff, 0xff,
    0xff, 0xff, 0xff, 0xff, 0xff, 0xfc, 0x00, 0x00, 0x00, 0x0a, 0x00, 0x1f, 0xff, 0xff, 0xff, 0xff,
    0xff, 0xff, 0xff, 0xff, 0xff, 0xfc, 0x00, 0x00, 0x14, 0x9e, 0x00, 0x1f, 0xff, 0xff, 0xff, 0xff,
    0xff, 0xff, 0xff, 0xff, 0xff, 0xfc, 0x00, 0x00, 0x36, 0x3f, 0x00, 0x1f, 0xff, 0xff, 0xff, 0xff,
    0xff, 0xff, 0xff, 0xff, 0xff, 0xfc, 0x00, 0x00, 0x6d, 0xff, 0x00, 0x1f, 0xff, 0xff, 0xff, 0xff,
    0xff, 0xff, 0xff, 0xff, 0xff, 0xfc, 0x00, 0x00, 0xfb, 0xff, 0x80, 0x1f, 0xff, 0xff, 0xff, 0xff,
    0xff, 0xff, 0xff, 0xff, 0xff, 0xfc, 0x00, 0x03, 0xd7, 0xff, 0x80, 0x0f, 0xff, 0xff, 0xff, 0xff,
    0xff, 0xff, 0xff, 0xff, 0xff, 0xf8, 0x00, 0x07, 0xef, 0xff, 0x80, 0x07, 0xff, 0xff, 0xff, 0xff,
    0xff, 0xff, 0xff, 0xff, 0xff, 0xf8, 0x00, 0x0f, 0xdf, 0xff, 0x90, 0x07, 0xff, 0xff, 0xff, 0xff,
    0xff, 0xff, 0xff, 0xff, 0xff, 0xf8, 0x00, 0x0f, 0xbf, 0xff, 0xd0, 0x07, 0xff, 0xff, 0xff, 0xff,
    0xff, 0xff, 0xff, 0xff, 0xff, 0xf0, 0x00, 0x1d, 0x7f, 0xff, 0xd0, 0x07, 0xff, 0xff, 0xff, 0xff,
    0xff, 0xff, 0xff, 0xff, 0xff, 0xf0, 0x01, 0x1b, 0xff, 0xff, 0xc0, 0x07, 0xff, 0xff, 0xff, 0xff,
    0xff, 0xff, 0xff, 0xff, 0xff, 0xf0, 0x02, 0xa7, 0xff, 0xff, 0xc0, 0x07, 0xff, 0xff, 0xff, 0xff,
    0xff, 0xff, 0xff, 0xff, 0xff, 0xe0, 0x00, 0x03, 0xff, 0xc0, 0x00, 0x07, 0xff, 0xff, 0xff, 0xff,
    0xff, 0xff, 0xff, 0xff, 0xff, 0xe0, 0x00, 0x00, 0xff, 0x80, 0x00, 0x0b, 0xff, 0xff, 0xff, 0xff,
    0xff, 0xff, 0xff, 0xff, 0xff, 0xc0, 0x03, 0xff, 0xff, 0xff, 0xf0, 0x0f, 0xff, 0xff, 0xff, 0xff,
    0xff, 0xff, 0xff, 0xff, 0xff, 0x80, 0x07, 0xff, 0xff, 0xff, 0xf0, 0x0f, 0xff, 0xff, 0xff, 0xff,
    0xff, 0xff, 0xff, 0xff, 0xff, 0x00, 0x0f, 0x07, 0xff, 0xf8, 0xf8, 0x03, 0xff, 0xff, 0xff, 0xff,
    0xff, 0xff, 0xff, 0xff, 0xff, 0x00, 0x0e, 0x01, 0xff, 0xc0, 0x38, 0x07, 0xff, 0xff, 0xff, 0xff,
    0xff, 0xff, 0xff, 0xff, 0xff, 0x00, 0x1c, 0x46, 0xff, 0xb1, 0x18, 0x07, 0xff, 0xff, 0xff, 0xff,
    0xff, 0xff, 0xff, 0xff, 0xfe, 0x00, 0x3f, 0x97, 0xff, 0xc0, 0x7a, 0x07, 0xff, 0xff, 0xff, 0xff,
    0xff, 0xff, 0xff, 0xff, 0xfe, 0x00, 0x3f, 0xff, 0xff, 0xff, 0xfe, 0x03, 0xff, 0xff, 0xff, 0xff,
    0xff, 0xff, 0xff, 0xff, 0xfe, 0x00, 0x3f, 0xff, 0xff, 0xff, 0xfe, 0x03, 0xff, 0xff, 0xff, 0xff,
    0xff, 0xff, 0xff, 0xff, 0xfe, 0x01, 0x3f, 0xff, 0xff, 0xff, 0xfe, 0x01, 0xff, 0xff, 0xff, 0xff,
    0xff, 0xff, 0xff, 0xff, 0xfe, 0x01, 0xbf, 0xff, 0xff, 0xff, 0xfe, 0x81, 0xff, 0xff, 0xff, 0xff,
    0xff, 0xff, 0xff, 0xff, 0xfc, 0x00, 0xbf, 0xff, 0xff, 0xff, 0xfc, 0x81, 0xff, 0xff, 0xff, 0xff,
    0xff, 0xff, 0xff, 0xff, 0xfc, 0x00, 0xff, 0xff, 0xfe, 0xff, 0xfd, 0x83, 0xff, 0xff, 0xff, 0xff,
    0xff, 0xff, 0xff, 0xff, 0xf8, 0x00, 0xbf, 0xff, 0xfe, 0xff, 0xfd, 0x01, 0xff, 0xff, 0xff, 0xff,
    0xff, 0xff, 0xff, 0xff, 0xf8, 0x00, 0x7f, 0xff, 0xff, 0xff, 0xff, 0x01, 0xff, 0xff, 0xff, 0xff,
    0xff, 0xff, 0xff, 0xff, 0xf0, 0x00, 0x7f, 0xff, 0xff, 0xff, 0xfb, 0x03, 0xff, 0xff, 0xff, 0xff,
    0xff, 0xff, 0xff, 0xff, 0xe0, 0x00, 0x3f, 0xff, 0xdc, 0xff, 0xfa, 0x03, 0xff, 0xff, 0xff, 0xff,
    0xff, 0xff, 0xff, 0xff, 0xd8, 0x00, 0x1f, 0xff, 0xff, 0xff, 0xf8, 0x03, 0xff, 0xff, 0xff, 0xff,
    0xff, 0xff, 0xff, 0xff, 0xd0, 0x00, 0x1f, 0xff, 0xff, 0xff, 0xf8, 0x01, 0xff, 0xff, 0xff, 0xff,
    0xff, 0xff, 0xff, 0xff, 0x90, 0x00, 0x1f, 0xff, 0xff, 0xff, 0xf8, 0x02, 0xff, 0xff, 0xff, 0xff,
    0xff, 0xff, 0xff, 0xff, 0xb0, 0x00, 0x0f, 0xf5, 0xff, 0xd7, 0xf8, 0x01, 0xff, 0xff, 0xff, 0xff,
    0xff, 0xff, 0xff, 0xff, 0xb0, 0x00, 0x0f, 0xff, 0xff, 0xff, 0xf8, 0x00, 0x5f, 0xff, 0xff, 0xff,
    0xff, 0xff, 0xff, 0xff, 0xa0, 0x00, 0x0f, 0xfb, 0xff, 0xff, 0xf0, 0x00, 0x3f, 0xff, 0xff, 0xff,
    0xff, 0xff, 0xff, 0xff, 0x80, 0x00, 0x0f, 0xfd, 0xff, 0xdf, 0xf0, 0x00, 0x3f, 0xff, 0xff, 0xff,
    0xff, 0xff, 0xff, 0xff, 0x80, 0x00, 0x07, 0xff, 0xff, 0xbf, 0xf0, 0x00, 0x0f, 0xff, 0xff, 0xff,
    0xff, 0xff, 0xff, 0xff, 0x80, 0x00, 0x07, 0xff, 0xff, 0xff, 0xe0, 0x00, 0x87, 0xff, 0xff, 0xff,
    0xff, 0xff, 0xff, 0xff, 0x80, 0x00, 0x03, 0xff, 0xff, 0xff, 0xc0, 0x00, 0x43, 0xff, 0xff, 0xff,
    0xff, 0xff, 0xff, 0xff, 0x60, 0x00, 0x01, 0xff, 0xff, 0xff, 0xc0, 0x00, 0x73, 0xff, 0xff, 0xff,
    0xff, 0xff, 0xff, 0xfe, 0xe0, 0x00, 0x00, 0xff, 0xff, 0xff, 0x80, 0x00, 0x7b, 0xff, 0xff, 0xff,
    0xff, 0xff, 0xff, 0xfd, 0xe0, 0x00, 0x00, 0x7f, 0xff, 0xfe, 0x00, 0x00, 0x33, 0xff, 0xff, 0xff,
    0xff, 0xff, 0xff, 0xfd, 0xe0, 0x00, 0x00, 0x3f, 0xff, 0xf8, 0x00, 0x00, 0x27, 0xff, 0xff, 0xff,
    0xff, 0xff, 0xff, 0xff, 0xe0, 0x00, 0x00, 0x0f, 0xff, 0xf0, 0x00, 0x00, 0x0f, 0xff, 0xff, 0xff,
    0xff, 0xff, 0xff, 0xff, 0x60, 0x00, 0x00, 0x67, 0xff, 0xe0, 0x00, 0x00, 0x1b, 0xff, 0xff, 0xff,
    0xff, 0xff, 0xff, 0xfd, 0x40, 0x00, 0x00, 0xf3, 0xff, 0xc4, 0x00, 0x00, 0x0b, 0xff, 0xff, 0xff,
    0xff, 0xff, 0xff, 0xfe, 0x80, 0x00, 0x00, 0xfc, 0xff, 0x8c, 0x00, 0x00, 0x03, 0xff, 0xff, 0xff,
    0xff, 0xff, 0xff, 0xfe, 0x00, 0x00, 0x00, 0x7f, 0x3c, 0x3c, 0x00, 0x00, 0x07, 0xff, 0xff, 0xff,
    0xff, 0xff, 0xff, 0xff, 0x00, 0x00, 0x00, 0x3f, 0xc0, 0x7c, 0x00, 0x00, 0x03, 0xff, 0xff, 0xff,
    0xff, 0xff, 0xff, 0xff, 0x00, 0x00, 0x00, 0x1f, 0xff, 0xfc, 0x00, 0x00, 0x03, 0xff, 0xff, 0xff
};

void setup() {
  Serial.begin(115200);

  if(!display.begin(SSD1306_SWITCHCAPVCC, 0x3C)) {
    Serial.println(F("SSD1306 allocation failed"));
    for(;;);
  }
  delay(2000); // Pause for 2 seconds

  // Clear the buffer.
  display.clearDisplay();

  // Draw bitmap on the screen
  display.drawBitmap(0, 0, image_data_Saraarray, 128, 64, 1);
  display.display();
}

void loop() {

}
Después de subir el código, esto es lo que obtenemos en la pantalla.

Mostrar temperatura y humedad en la pantalla OLED con Arduino
En esta sección construiremos un proyecto que muestra lecturas de temperatura y humedad en la pantalla OLED. Obtendremos la temperatura y la humedad usando el sensor de temperatura y humedad DHT11. Si no estás familiarizado con el sensor DHT11, lee el siguiente artículo:
Componentes necesarios
Para completar este proyecto necesitas los siguientes componentes:
- Pantalla OLED de 0.96 pulgadas
- Arduino – Lee Best Arduino Starter Kits
- DHT11 o DHT22 sensor de temperatura y humedad
- Protoboard
- Resistencia de 4.7k Ohm (o resistencia de 10k Ohm)
- Cables de conexión (jumpers)
Puedes usar los enlaces anteriores o ir directamente a MakerAdvisor.com/tools para encontrar todas las piezas de tus proyectos al mejor precio.

Esquemático
Arma el circuito siguiendo el siguiente diagrama esquemático.

Nota: si usas un módulo con sensor DHT, normalmente viene con solo tres pines. Los pines deberían estar etiquetados para que sepas cómo conectarlos. Además, muchos de estos módulos ya vienen con una resistencia pull-up interna, por lo que no necesitas agregar una al circuito.
Instalar las bibliotecas
Antes de continuar, asegúrate de haber instalado las bibliotecas “adafruit_GFX.h” y “adafruit_SSD1306.h” para controlar la pantalla OLED.
Para este proyecto también necesitas dos bibliotecas adicionales para leer del sensor DHT: la biblioteca DHT y la biblioteca Adafruit_Sensor. Sigue los siguientes pasos para instalarlas
1. Abre el IDE de Arduino y ve a Sketch > Include Library > Manage Libraries. Debería abrirse el Gestor de Bibliotecas.
2. Busca “DHT” en la caja de búsqueda e instala la biblioteca DHT de Adafruit.

3. Después de instalar la biblioteca DHT de Adafruit, escribe “Adafruit Unified Sensor” en la caja de búsqueda. Baja hasta el final para encontrar la biblioteca e instálala.

4. Reinicia el IDE de Arduino.
Código
Después de instalar todas las bibliotecas necesarias, puedes subir el siguiente código.
/*********
  Rui Santos
  Complete project details at https://randomnerdtutorials.com
*********/

#include <Wire.h>
#include <Adafruit_GFX.h>
#include <Adafruit_SSD1306.h>
#include <Adafruit_Sensor.h>
#include <DHT.h>

#define SCREEN_WIDTH 128 // OLED display width, in pixels
#define SCREEN_HEIGHT 64 // OLED display height, in pixels

// Declaration for an SSD1306 display connected to I2C (SDA, SCL pins)
Adafruit_SSD1306 display(SCREEN_WIDTH, SCREEN_HEIGHT, &Wire, -1);

#define DHTPIN 2     // Digital pin connected to the DHT sensor

// Uncomment the type of sensor in use:
#define DHTTYPE    DHT11     // DHT 11
//#define DHTTYPE    DHT22     // DHT 22 (AM2302)
//#define DHTTYPE    DHT21     // DHT 21 (AM2301)

DHT dht(DHTPIN, DHTTYPE);

void setup() {
  Serial.begin(115200);

  dht.begin();

  if(!display.begin(SSD1306_SWITCHCAPVCC, 0x3C)) {
    Serial.println(F("SSD1306 allocation failed"));
    for(;;);
  }
  delay(2000);
  display.clearDisplay();
  display.setTextColor(WHITE);
}

void loop() {
  delay(5000);

  //read temperature and humidity
  float t = dht.readTemperature();
  float h = dht.readHumidity();
  if (isnan(h) || isnan(t)) {
    Serial.println("Failed to read from DHT sensor!");
  }

  //clear display
  display.clearDisplay();

  // display temperature
  display.setTextSize(1);
  display.setCursor(0,0);
  display.print("Temperature: ");
  display.setTextSize(2);
  display.setCursor(0,10);
  display.print(t);
  display.print(" ");
  display.setTextSize(1);
  display.cp437(true);
  display.write(167);
  display.setTextSize(2);
  display.print("C");

  // display humidity
  display.setTextSize(1);
  display.setCursor(0, 35);
  display.print("Humidity: ");
  display.setTextSize(2);
  display.setCursor(0, 45);
  display.print(h);
  display.print(" %");

  display.display();
}
Cómo funciona el código
Lee esta sección si quieres aprender cómo funciona el código. De lo contrario, puedes saltar a la sección “Demostración”.
Importar bibliotecas
El código comienza incluyendo las bibliotecas necesarias. Las bibliotecas Wire, Adafruit_GFX y Adafruit_SSD1306 se usan para comunicarse con la pantalla OLED. Las bibliotecas Adafruit_Sensor y DHT se usan para comunicarse con los sensores DHT22 o DHT11.
#include <Wire.h>
#include <Adafruit_GFX.h>
#include <Adafruit_SSD1306.h>
#include <Adafruit_Sensor.h>
#include <DHT.h>
Crear un objeto display
Luego, define las dimensiones de tu pantalla OLED. En este caso, usamos una pantalla de 128×64 pixeles.
#define SCREEN_WIDTH 128 // OLED display width, in pixels
#define SCREEN_HEIGHT 64 // OLED display height, in pixels
Después, inicializa un objeto display con el ancho y el alto definidos antes, usando el protocolo de comunicación I2C (&Wire).
Adafruit_SSD1306 display(SCREEN_WIDTH, SCREEN_HEIGHT, &Wire, -1);El parámetro (-1) significa que tu pantalla OLED no tiene pin RESET. Si tu pantalla OLED sí tiene pin RESET, debe conectarse a un GPIO. En ese caso, debes pasar el número de GPIO como parámetro.
Crear un objeto DHT
Luego, define el tipo de sensor DHT que estás usando. Si usas un DHT11, no necesitas cambiar nada en el código. Si usas otro sensor, solo descomenta el sensor que estés usando y comenta los demás.
#define DHTTYPE    DHT11     // DHT 11
//#define DHTTYPE    DHT22     // DHT 22 (AM2302)
//#define DHTTYPE    DHT21     // DHT 21 (AM2301)
Inicializa un objeto sensor DHT con el pin y el tipo definidos antes.
DHT dht(DHTPIN, DHTTYPE);setup()
En el setup(), inicializa el monitor serial con fines de depuración.
Serial.begin(115200);Inicializa el sensor DHT:
dht.begin();Luego, inicializa la pantalla OLED.
if(!display.begin(SSD1306_SWITCHCAPVCC, 0x3C)) { // Address 0x3D for 128x64
  Serial.println(F("SSD1306 allocation failed"));
  for(;;);
}
En este caso, la dirección de la pantalla OLED que usamos es 0x3C. Si esta dirección no funciona, puedes ejecutar un sketch escáner I2C para encontrar la dirección de tu OLED. Puedes encontrar aquí el sketch escáner I2C.
Agrega un retardo para dar tiempo a que la pantalla se inicialice, limpia la pantalla y define el color del texto en blanco:
delay(2000);
display.clearDisplay();
display.setTextColor(WHITE)
En el loop() es donde leemos el sensor y mostramos la temperatura y la humedad en la pantalla.
Obtener lecturas de temperatura y humedad del DHT
La temperatura y la humedad se guardan en las variables t y h, respectivamente. Leer la temperatura y la humedad es tan simple como usar los métodos readTemperature() y readHumidity() en el objeto dht.
float t = dht.readTemperature();
float h = dht.readHumidity();
En caso de que no podamos obtener las lecturas, muestra un mensaje de error:
if (isnan(h) || isnan(t)) {
  Serial.println("Failed to read from DHT sensor!");
}
Si obtienes ese mensaje de error, lee nuestra guía de solución de problemas: cómo arreglar “Failed to read from DHT sensor”.
Mostrar las lecturas del sensor en la pantalla OLED
Las siguientes líneas muestran la temperatura en la pantalla OLED.
  display.setTextSize(1);
  display.setCursor(0,0);
  display.print("Temperature: ");
  display.setTextSize(2);
  display.setCursor(0,10);
  display.print(t);
  display.print(" ");
  display.setTextSize(1);
  display.cp437(true);
  display.write(167);
  display.setTextSize(2);
  display.print("C");
Usamos el método setTextSize() para definir el tamaño de la fuente, el setCursor() define dónde debe empezar a mostrarse el texto y el método print() se usa para escribir algo en la pantalla.
Para imprimir la temperatura y la humedad solo necesitas pasar sus variables al método print() de la siguiente manera:
display.print(t);La etiqueta “Temperature” se muestra en tamaño 1, y la lectura en sí se muestra en tamaño 2.
Para mostrar el símbolo º, usamos la fuente Code Page 437. Para eso, necesitas fijar cp437 en true de la siguiente manera:
display.cp437(true);Luego, usa el método write() para mostrar el carácter que elijas. El símbolo º corresponde al carácter 167.
display.write(167);Se usa un enfoque similar para mostrar la humedad:
display.setTextSize(1);
display.setCursor(0, 35);
display.print("Humidity: ");
display.setTextSize(2);
display.setCursor(0, 45);
display.print(h);
display.print(" %");
No olvides que necesitas llamar a display.display() al final, para que realmente puedas mostrar algo en la OLED.
display.display(); Demostración
Después de cablear el circuito y subir el código, la pantalla OLED muestra las lecturas de temperatura y humedad. Las lecturas del sensor se actualizan cada cinco segundos.

Solución de problemas
Si tu sensor DHT no logra obtener las lecturas o si obtienes el mensaje “Failed to read from DHT sensor”, lee nuestra Guía de solución de problemas del DHT para ayudarte a resolver ese problema.
Si obtienes el error “SSD1306 allocation failed” o si la OLED no muestra nada en la pantalla, puede deberse a uno de los siguientes problemas:
Dirección I2C incorrecta
La dirección I2C de la pantalla OLED que usamos es 0x3C. Sin embargo, la tuya puede ser diferente. Así que asegúrate de verificar la dirección I2C de tu pantalla usando un sketch escáner I2C.
SDA y SCL no conectados correctamente
Por favor, asegúrate de tener los pines SDA y SCL de la pantalla OLED cableados correctamente.
Artículo traducido al español. Fuente original: Guide for I2C OLED Display with Arduino — Random Nerd Tutorials